It is possible to create multiple fully-installed linux installations on a single E2B USB drive by creating image partition files (.imgPTN files).
We can do this by making fake 'blank' partitions on our E2B USb drive (.imgPTNfile) and then using Virtual Box with DavidV's VMUB utility to install linux onto it.
Use the latest MPI Tool Pack (v.0.054 2015-08-21 or later). This includes CSM menu support for grub2/syslinux installations on the 3rd partition.
Kali.imgPTN (38MB - accept default size)
Use Make_Ext.exe to make the second large OS file - you should pick the file system that you intend to use (e.g. ext3 or ext4).
USB:\Kali (set size as required - e.g. 15000 for 15GB)
We can do this by making fake 'blank' partitions on our E2B USb drive (.imgPTNfile) and then using Virtual Box with DavidV's VMUB utility to install linux onto it.
Use the latest MPI Tool Pack (v.0.054 2015-08-21 or later). This includes CSM menu support for grub2/syslinux installations on the 3rd partition.
Brief Instructions (not for beginners!)
Important Note: Before you begin, save the MBR sector of your E2B USB drive in case anything goes wrong. Use RMPrepUSB - Drive>File - name=E2BMBR.BIN, start=0, size=512, filestart=0. Save the file to your Windows hard drive for safe keeping. If you find that you cannot return back to the E2B menu, restore the original MBR using RMPrepUSB - File>Drive.
Warning: The instructions below are really 'notes' on how I made a partition image containing KALI on my E2B USB drive. You should be familiar with VBox+VMUB and linux installs and MakePartImage before you attempt this!
You may also find the blog post here for Manjaro linux useful.
I used a Win10 64-bit host system to run VBox on, and the kali-linux-light-2.0-i386.iso ISO file for this procedure. I also used a Lexar S25 64Gb USB 3.0 Removable USB Flash drive to hold E2B.
1. Create an empty folder on the Windows Desktop and drag-and-drop the empty folder onto the MPI_FAT32 Desktop shortcut.
Kali.imgPTN (38MB - accept default size)
Use Make_Ext.exe to make the second large OS file - you should pick the file system that you intend to use (e.g. ext3 or ext4).
USB:\Kali (set size as required - e.g. 15000 for 15GB)
It will need to be at least 3GB for the mini version of Kali with no swapfile - if you want to add a 4GB swapfile, you will need to add 4GB to the size.
Now copy/move the files to your E2B USB drive. You now should have:
\_ISO\LINUX\Kali.imgPTN (38MB)
\_ISO\LINUX\Kali (15GB)
2. Use VBox+VMUB, Create a new linux diskless VM in VBox and boot to E2B and select the Kali.imgPTN file and get to the Kali CSM menu.
3. Quit the CSM menu and the VM.
4. In VBox, add a virtual CD with the Kali ISO as the content of the virtual CD. Ensure that the CD-ROM is in the boot order.
A virtual hard disk should not be present in the VM, just the USB drive and the virtual CD.
5. Run VBox (via VMUB) and allow the VM to boot from the ISO (not the USB drive) - press F12 if required to boot from the 'CD'.
Choose the Kali Graphical Install menu option.
6. Install Kali to sda3 only (make sure the size matches the size you created e.g. 15GB) - choose 'manual' - Do NOT change any partition sizes!
Tick the Format box so sda3 is reformatted.
If you do not see the partition /dev/sda3 listed, use fdisk in the terminal and then re-launch the installer..
sudo fdisk /dev/sda
t
3
83
w
7. Select #3 and set sda3 as the boot partition and root (do not change the filesystem type - this avoids it re-partitioning the drive).
Here is the 'before' screenshot...

and the 'after' screenshot...

Quit the CSM menu. You should be able to access the files on the USB drive using Windows Explorer...
If you did not use the MPI Tool Pack v0.054 or later, you will need to edit the menu.lst as below...

sudo dd if=/dev/zero of=/swapfile bs=1G count=4
sudo chmod 600 /swapfile
sudo mkswap /swapfile
sudo swapon /swapfile free -m (to check swap space is now active) or try just sudo swapon
sudo nano /etc/fstab (add new line /swapfile none swap sw 0 0)
Because the grub2 boot code is effectively hard-coded into the partition boot record, the two files will not work if you simply copy them to another E2B USB drive or move the files to another folder and wipe the original files.
Once you have booted to Kali, you need to find the \boot\grub\grub.cfg file and find the lines which load the kernel. Then translate them to grub4dos commands and add them into the \menu.lst:

/boot/grub/grub.cfg file showing the lines which load Kali (click to enlarge).
Here is the grub4dos version for my Kali ISO. I added these lines to the bottom of the \menu.lst file.
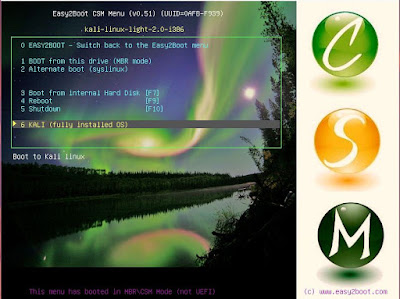
title Kali (fully installed OS)\n Boot to Kali linux
parttype (hd0,2) 0x83
root (hd0,2)
# get UUID of drive
uuid () > nul
set UUID=%?%
kernel /boot/vmlinuz-4.0.0-kali1-686-pae root=UUID=%UUID% ro initrd=/install/gtk/initrd.gz quiet
initrd /boot/initrd.img-4.0.0-kali1-686-pae
OR for 4.9.0
You should now be able to copy the Kali and Kali.imgPTN files to another E2B USB drive or another system or move the files to another folder without problems.
The same technique can be applied to other linux distros. If they use syslinux instead of grub2, you will need to find the syslinux.cfg file and translate that into 'grub4dos-speak'.
Good luck!
Now copy/move the files to your E2B USB drive. You now should have:
\_ISO\LINUX\Kali.imgPTN (38MB)
\_ISO\LINUX\Kali (15GB)
2. Use VBox+VMUB, Create a new linux diskless VM in VBox and boot to E2B and select the Kali.imgPTN file and get to the Kali CSM menu.
3. Quit the CSM menu and the VM.
4. In VBox, add a virtual CD with the Kali ISO as the content of the virtual CD. Ensure that the CD-ROM is in the boot order.
A virtual hard disk should not be present in the VM, just the USB drive and the virtual CD.
5. Run VBox (via VMUB) and allow the VM to boot from the ISO (not the USB drive) - press F12 if required to boot from the 'CD'.
Choose the Kali Graphical Install menu option.
6. Install Kali to sda3 only (make sure the size matches the size you created e.g. 15GB) - choose 'manual' - Do NOT change any partition sizes!
Tick the Format box so sda3 is reformatted.
If you do not see the partition /dev/sda3 listed, use fdisk in the terminal and then re-launch the installer..
sudo fdisk /dev/sda
t
3
83
w
7. Select #3 and set sda3 as the boot partition and root (do not change the filesystem type - this avoids it re-partitioning the drive).
Here is the 'before' screenshot...

Make sure you select the #3 partition
and the 'after' screenshot...

Set #3 it to be the boot partition and root (/) partition. I used ext2 but ext3/4 should also work and is recommended as it is much less prone to corruption.
Since the partition 2 slot is empty, we do not want to allow it to delete or create a new partition - by keeping the file system the same we should avoid creating a new partition.
To continue, select the 'Finish partitioning and write changes to disk' option.
Say 'No' to the Swap partition as we do not have any other partitions available.
Note: If formatting fails, create a fresh, new VM in VBox and try again. If you have already tried the install once before and now it refuses to format the sda3 partition (reports an error before copying any files), then reboot to the E2B menu and delete the large Kali file and re-copy a fresh version and try again.
8. IMPORTANT - READ CAREFULLY!
When prompted to install a boot loader (e.g. grub2) to sda, we do NOT want to install it to the MBR or sda (the raw disk).
Before pressing 'Continue' check that there is no mention of 'sda' or '/dev/sda'.
Instead we want to install the boot loader to the sda3 partition, so answer 'No' for an MBR install to sda and then select 'Enter device manually' to specify /dev/sda3.
Note: If you make a mistake here, you may not be able to restore your E2B partition later unless you made a backup of the original MBR!
9. When the installation has completed, the VM should reboot back to the CSM menu.
If you do not get the CSM menu, you can re-install grub4dos to the MBR using RMPrepUSB - Install grub4dos - Yes=MBR. Do not overwrite the \grldr file if prompted. You may need to restore the saved MBR first if it has been overwritten by the grub2 boot code. Then reboot to E2B and re-select the .imgPTN file to get to the CSM menu and try installing again from the ISO,
Quit the CSM menu. You should be able to access the files on the USB drive using Windows Explorer...
If you did not use the MPI Tool Pack v0.054 or later, you will need to edit the menu.lst as below...
10. If there is a Boot to Partition 2 entry in the CSM menu, the next step is not needed.

We need to add a Kali menu entry to the CSM boot menu if the 'Boot to Partition 2' entry is not present. Add the following lines to the end of the CSM \menu.lst file:
title Kali (fully installed OS)\n Boot to Kali linux
parttype (hd0,2) 0x83
chainloader (hd0,2)+1

If the boot options #1 and #2 don't work, you can find the menu entries in the \menu.lst file and delete them if you want to tidy up the menu.
 |
| If the standard boot option does not work, try a 'Fallback' menu option. |
11. If you wish, you can boot to Kali and create a swapfile (which will be created inside our 15GB partition image).
I followed the instructions here
In brief, the commands I used to create a 4GB swapfile were:
sudo chmod 600 /swapfile
sudo mkswap /swapfile
sudo swapon /swapfile free -m (to check swap space is now active) or try just sudo swapon
sudo nano /etc/fstab (add new line /swapfile none swap sw 0 0)
Making the .imgPTN files portable
Note: The MPI Tool Pack v0.054+ already includes a 'Boot to Partition 2' menu option, so the menu below should not be necessary.
Once you have booted to Kali, you need to find the \boot\grub\grub.cfg file and find the lines which load the kernel. Then translate them to grub4dos commands and add them into the \menu.lst:

/boot/grub/grub.cfg file showing the lines which load Kali (click to enlarge).
Here is the grub4dos version for my Kali ISO. I added these lines to the bottom of the \menu.lst file.
title Kali (fully installed OS)\n Boot to Kali linux
parttype (hd0,2) 0x83
root (hd0,2)
# get UUID of drive
uuid () > nul
set UUID=%?%
kernel /boot/vmlinuz-4.0.0-kali1-686-pae root=UUID=%UUID% ro initrd=/install/gtk/initrd.gz quiet
initrd /boot/initrd.img-4.0.0-kali1-686-pae
OR for 4.9.0
title Kali 4.9.0 (fully installed OS)\n Boot to Kali linux
parttype (hd0,2) 0x83
root (hd0,2)
# get UUID of drive
uuid () > nul
set UUID=%?%
kernel /boot/vmlinuz-4.9.0-kali4-amd64 root=UUID=%UUID% ro initrd=/install/gtk/initrd.gz quiet
initrd /boot/initrd.img-4.9.0-kali4-amd64
boot
The same technique can be applied to other linux distros. If they use syslinux instead of grub2, you will need to find the syslinux.cfg file and translate that into 'grub4dos-speak'.
Good luck!
WTF ???
ReplyDeleteyou wrote "Use Make_Ext.exe to make the second large OS file"
Where is this Programm "Make_Ext.exe" ???
Look in the main \ISO folder on the E2B USB drive! There is a batch file there which runs it for you.
Delete